Pressure washing has a lot more benefits than just rinsing off dirt or moss with your garden hose. It’s great for preparing surfaces for paint jobs and other home improvement projects.
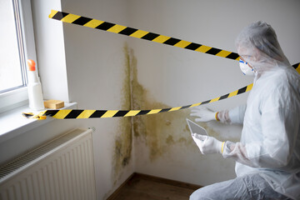
It also helps improve indoor air quality by removing mold, mildew and moss from exterior walls and roofs. Professionals use nozzles to adjust the water pressure for each surface to avoid damage. Contact WindowWorks LLC for professional help.
Professional window cleaners use a variety of cleaning solutions and a special wetting agent to achieve streak-free windows. Many also have a squeegee that they use to remove excess water from the glass. The squeegee should be rinsed and cleaned regularly to keep it clean and functioning at its best. Window washing can be very dangerous if the proper safety precautions are not taken. Ensure that the area is well-ventilated and that all necessary supplies are available before beginning the cleaning process.
A broom or brush should be used to sweep away cobwebs and other debris before starting the actual washing of the windows. This is especially important if you plan to use an extension pole, as a fall from a height could be very dangerous for the cleaner and those below them.
It is recommended that you begin washing the windows at the top of the building and work your way down, as this prevents dirty water from dripping onto freshly-cleaned areas. It is important to always soak your sponge or brush in hot soapy water before and throughout the washing process to help remove dirt and grime and to avoid scrubbing stains into the glass.
Once the windows have been wiped down with a soft cloth, most cleaners will be sprayed on using a device that is usually dipped into the solution and then swiped across the windows. It is important that there is enough solution to fully dissolve and suspend the dirt and grime so that it can be completely wiped off of the windows — skimp on the amount of cleaner and you will end up with unsightly streaks.
Stubborn marks may require the use of an abrasive pad before being squeegeed off the glass. This should only be done in a well-ventilated area, and the pad should be rinsed and cleaned regularly to prevent any scratches or discoloration of the glass.
Many commercial cleaning companies have their own specialized cleaning solution that they mix together in large batches. The ingredients vary depending on the manufacturer, but most contain an acid (like vinegar or alcohol) and an alkaline (like dish soap or borax). A good home solution is 2 tablespoons of ammonia, 1 cup of rubbing alcohol, and 1/2 teaspoon of liquid dishwashing detergent. It is suggested that you read the label on any cleaning solution you choose to use so you are familiar with the ingredients and their effect on the surface of the glass.
Window Washing Tips
Aside from the obvious need for proper training and safety equipment, a window washer should be knowledgeable of all the best practices for washing windows. For example, she should know how to properly use a vacuum or hose attachment, as well as how to clean the outsides of windows with a brush or sponge and how to wipe down window frames, grids, and hardware. She should also be able to identify and address potential risks such as spotting, streaking, or water spots and prevent these problems from occurring.
To minimize cleaning times and achieve a better finish, it’s essential to start with a fresh, clean canvas. This means a thorough dusting before washing to remove any loose dirt and cobwebs, followed by a quick rinse with the hose or sprayer attachment. It’s also important to choose a cleaner that won’t leave any streaks, such as a vinegar and water solution or a commercial glass cleaner — our tested guide to the best window cleaners includes some terrific recommendations.
Another way to improve your window washing results is by using a squeegee, which will help you dry your windows faster and more thoroughly. To ensure a streak-free finish, make sure you’re using a high-quality squeegee that’s made of durable materials and can withstand vigorous use. To avoid causing scratches, be sure to wipe the blade clean after each swipe and be gentle when wiping down corners.
For harder-to-reach outdoor windows, it may be necessary to use a ladder. If this is the case, it’s important that all members of your team have proper professional training and certification in order to work safely. This training should include instruction on the proper utilization of all PPE and safety equipment, hazard identification, risk mitigation, and safe reporting protocols.
If you’re cleaning a lot of windows at once, it helps to drape a drop cloth or sheet on the ground to catch any runoff. It’s also a good idea to work on a cool, cloudy day, as sunshine can speed up the drying time of your cleaning solution and lead to streaking or spotting.
Window Washing Equipment
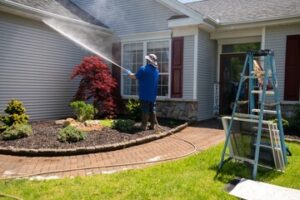
A pressure washer is a pump-driven machine that forces water through a narrow nozzle, creating high kinetic energy that blasts away dirt and grime from surfaces. These tools are ideal for tackling tough dirt, moss, mildew and mold that might otherwise require scrubbing with a scrub brush. However, it is important to use a suitable amount of pressure and not overdo the force as this can damage surfaces like vinyl siding.
It can also be helpful to pre-treat any particularly stubborn stains with a special cleaning product before applying the spray. This can help to break down the grit and lift it from the surface, making the pressure washing process easier and more effective. Several different abrasives can be used to create the right cleaning solution, depending on the type of surface being cleaned. For example, nylon abrasives can be used on screens and windows as they are gentle enough for these types of surfaces and don’t leave scratches behind. Walnut abrasives are also a good option as they can remove oily stains but won’t leave scratch marks. Finally, steel wool abrasives can be used on glass and metal as they clean well without leaving any scratches.
While it may seem obvious that a clean building is essential, the benefits of regular pressure washing go beyond simply appearance. Dirt and grit that builds up can lead to the growth of bacteria and vermin, as well as rust or corrosion on surfaces. Regular cleaning with a pressure washer can reduce the risk of these contaminants and keep your building and outdoor spaces free from harm.
Choosing the right window cleaning equipment will help your staff save time and effort while increasing their safety and efficiency. For example, using a battery powered Unger Stingray system allows you to clean windows up to 25% faster and with 39% less chemicals than traditional cloth window cleaning. It also eliminates the need to move or reposition furniture and reduces the need for ladders when reaching high or awkwardly positioned windows. Choose from a wide range of ergonomic window tools to suit your cleaning needs, including scrapers, squeegees and microfiber pads. For convenience, consider a holster or belt to hold your most-used items, such as a squeegee holster or bucket-on-a-belt.
Window Washing Solutions
While pressure washing is an effective cleaning method for various surfaces, it’s important to use caution when it comes to windows. The high water pressure from a power washer can shatter glass and damage window seals, which can lead to air or moisture leaks.
It’s also crucial to wear appropriate safety gear, including protective goggles and gloves, to avoid exposure to water spray or debris. It’s also a good idea to line up a ladder if you need to wash second-story windows, and to work in clear weather to minimize the risk of slips or falls.
In addition to the right equipment and safe operating techniques, a high-quality cleaning solution is essential for cleaning windows with a pressure washer. An all-natural solution of distilled white vinegar and water is a tried-and-true way to remove stubborn dirt buildup from windows. Vinegar has a natural acidic composition that effectively breaks down film and other surface contaminants.
When using a pressure washer to clean windows, start with a low-pressure setting and a fan pattern nozzle that disperses the water evenly. Apply your cleaning solution to the windows, and then use the nozzle to gently wash them with a light stream of water. It’s best to start at the top of each window and work your way down to avoid streaking.
Once you’ve washed each window, rinse it off with a fresh stream of clean water. Be sure to reapply your cleaning solution as needed, and to scrub any remaining contaminants with a soft brush or cloth. Finally, wipe down frames and sills with a lint-free cloth to reduce the risk of mold and water spots.
Regularly cleaning your windows with a power washer can significantly extend their lifespan, particularly those exposed to harsh elements like salt and humidity. However, it’s important to remember that the high water pressure from a power washer can also shatter glass and damage window seals, as well as erode wood frames and sills, leading to mold and rot. Therefore, it’s generally a better option to hire professional window cleaners with specialized equipment and expertise in using a power washer to clean windows.